The MGF site is hosted in France by the service provider PlanetHoster. The access codes to this site are in the MGF Dropbox: Site coordinates.txt. The annual cost is currently 72€, taken directly from the MGF credit card. PlanetHoster explains that this fee provides the following:
The World platform is a web hosting solution that offers a 100 % isolated environment for each of your websites and/or web applications. You are able to choose the physical location of the server per website (France + Switzerland or Canada). Also, each site is hosted on a different infrastructure—no more eggs in one basket (server/account). What’s more, each account is unlimited and can host as many websites as you wish. Basically, we allocate you a pool of resources and you decide how to distribute them. You can choose to create only 1 account and allocate the maximum amount of resources to it. You can also decide to spread your resources over as many accounts as possible with a minimum of 1 CPU, 1 GB RAM, and 1 MB/s I/O per account; you must also allocate a maximum of 8 CPUs, 24 GB RAM, and 24 MB/s I/O per account.
MGF has only one account/website: mediterraneangardening.fr. The fee also includes the registration of the domain name. When logging in to the PlanetHoster site, there is a dashboard with six options on the left. The most important of these is Web Hosting.
Web Hosting
Clicking ‘Web Hosting’ opens a drop-down box with three options:
Account Management: see next section;
Resource Management: selecting this option and then clicking ‘The World’ opens a panel which permits the sharing of resources (CPUs, RAM, etc.) between accounts. As MGF only has one account, all resources are allocated to it;
Create Account: used to create an additional website. Not needed unless MGF decides to host another site (e.g. if MGAP can no longer host the MGi site).
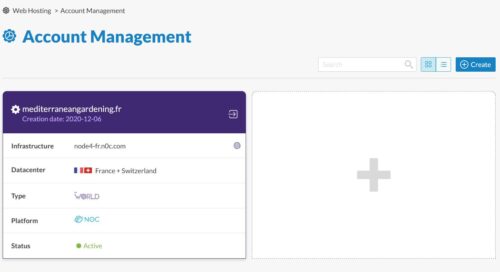
Account Management
This shows a panel with a tile for each account. For MGF, there is now only one: mediterraneangardening.fr. (Figure 1). Clicking the domain name or the gear wheel to its left opens a panel showing various information about the account, some of which can be modified (Figure 2). Clicking the gear wheel in this panel opens another panel with more information about the site and with a number of options for parameterisation (Figure 3). Normally, there will be no need to use any of the options shown in Figures 2 and 3.
Figure 1
Figure 2
Figure 3
Clicking the right-pointing arrow in the Figure 1 panel opens a new tab showing the site management console (NOC).
The NOC Console
The right panel displays information and statistics about the site. At top right is a link to the documentation of the console. At left is a sidebar with a number of options. It is beyond the scope of this documentation to describe all of these options. The ones most likely to be used are:
Messaging: click ‘Email accounts’ to access all the ‘@mediterraneangardening.fr’ mailboxes;
Languages: select which version of PHP is to be used and also which extensions;
Databases: management of database users and passwords – access to phpMyAdmin;
Files: access to system terminal.
Options other than Web Hosting
My Account
Selecting this option opens a drop-down box with seven options; only the ones listed below are relevant to MGF.
Profile: manage the details of the PlanetHoster account holder, including the credit card details for payments;
Communication: list of emails sent by PlanetHoster to the account email address (intmedgard@gmail.com);
Contacts: allows the possibility to have more than one person accessing the host site (not recommended for security reasons);
Security: shows login details to the account and allows some parameterisation.
Domain Names
Click ‘Domain management’ to see information about the domain name (expiry date, WHOIS information, etc.).
Billing
Details and status of invoices received and/or paid.
My Support
Access to knowledge database as well as creation and management of support requests.
Backup and recovery of the site is performed by the BlogVault plugin (subscription paid annually by automatically debiting the MGF credit card). The backup data is stored in a different location from the site hosted by PlanetHoster. Although the location of the backup site is unknown to us, it is within the EU and so meets GDPR requirements.
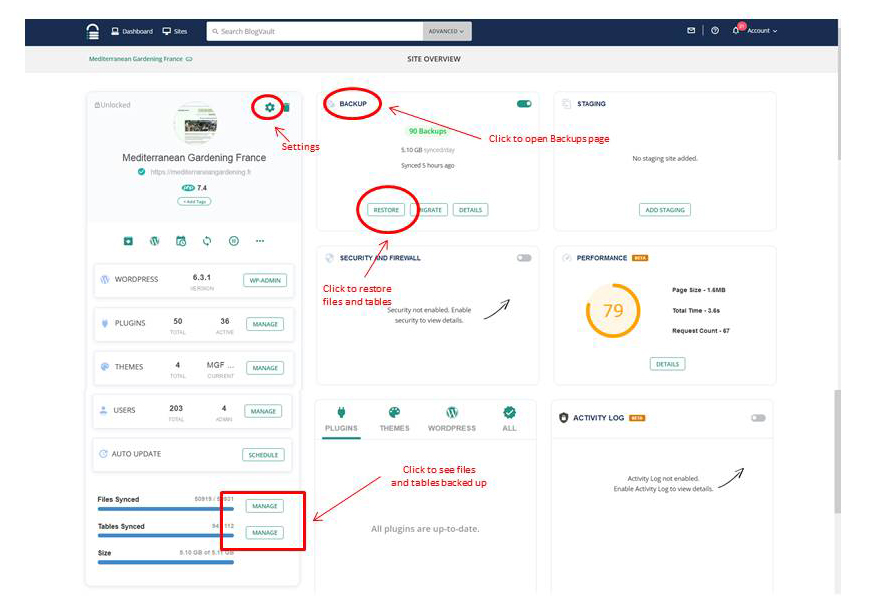
Backup (or to use BlogVault’s term, syncing) is performed automatically once a day at 0540 French time. The frequency and timing of automatic syncs can be changed in the plugin settings. To do so, click the gearwheel icon on the Site Overview page (Figure 2). By default, the plugin backs up all files that it recognises as being part of a standard WordPress installation:
the WordPress database (any table in the database whose prefix is ‘wp_mgf_’);
most of the content of the public_html folder (themes, plugins, media library, etc.).
In addition to the automatic backups, you can perform an additional backup at any time (for example, before a major modification to the site). As the backups are incremental, they only take about 3-5 minutes to complete. There are a number of ways to start a backup:
on the BlogVault dashboard (Figure 1), click the rotating arrows icon;
on the Site Overview page (Figure 2), click BACKUP, and then ‘Backup now’.
To use the plugin, click ‘BlogVault’ in the dashboard sidebar and then ‘Visit dashboard’. This will open the BlogVault dashboard in a new browser tab. This lists all the sites associated with the BlogVault account. For MGF, there is only the one. To perform a backup, click the rotating arrows icon at the right of the page. For other functions, click the thumbnail of the MGF home page on the left to open the Site Overview page.
To see which files are backed up, on the Site Overview page, scroll down and click ‘Manage’ next to ‘Files synced’ or ‘Tables synced’. Any files which are not automatically backed up can be added.
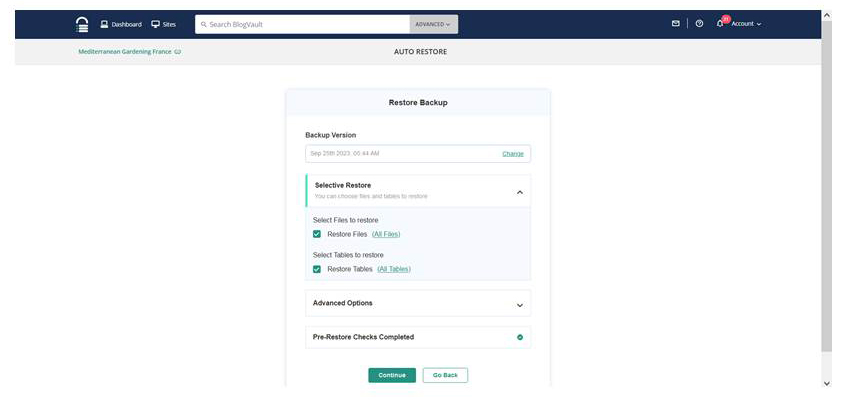
You can restore the whole site or individual files or tables. To restore items, in the BACKUP panel on the Site Overview page. click ‘RESTORE’ to open the Restore page (Figure 3). First, select the backup version to use. By default, the latest one is selected but you can choose earlier ones by clicking ‘Change’. If you want a complete restore, click ‘Continue’. This will start the restore. A progress page will be displayed which will then state when the restore is complete. A confirmatory email will also be sent to the email address associated with the account (intmedgard@gmail.com).
To restore selected files or tables, first open the ‘Selective restore’ box by clicking the down arrow. Next, select which files and/or tables are to be restored. By default, all files and tables are selected. uncheck ‘Restore Files’ and ‘Restore Tables’ and then click ‘No File Selected’ or ‘No Table Selected’ as appropriate. This will display a file map and individual files or folders can be selected. The contents of folders can be seen by clicking the down arrows at the right of the list. Check the files to be restored and click ‘Confirm’. This returns you to the Restore page. Click ‘Continue’ as described above.
As an organisation which communicates with its members solely by electronic means, email addresses are very important to MGF. As a sensitive item of personal information, they must be stringently protected.
Member email addresses
In each member record is an email address which the member provided at the time that they joined the association. This is used for all communication with the member. It can be changed at any moment by either the member themself or by a member of the MGF’s Member Management team.
Some members share an email address with their partner. In the original MGF Member App, this was not a problem but it is a requirement of WordPress that email addresses be unique and may not be shared by more than one member. As a result, one member of the couple has to be assigned a domain mailbox (see next section). This is only an issue for couples who joined MGF prior to the establishment of the new site and, at time of writing, only affects seven pairs of members.
The member record of one member of the pair has the couple’s own email address; the other has a domain mailbox which uses the first part of this address but with the suffix ‘@mediterraneangardening.fr’. For example, John and Jane Doe have a shared email address of ‘thedoes@gmail.com’. In the MGF system, one member record will have ‘thedoes@gmail.com’ and the other will have ‘thedoes@mediterraneangardening.fr’. As explained in the next section, this process is invisible to the members themselves.
Domain mailboxes
As part of the contract with its internet service provider PlanetHoster, MGF can create mailboxes using its domain name (i.e. xxxx@mediterraneangardening.fr). It uses these for two purposes:
to provide a solution to the member shared email address problem;
to provide institutional mailboxes for the reception of mail sent to one of MGF’s management team (see next section).
These mailboxes use the webmail product Roundcube. However, in all cases, domain mailboxes are used solely as pass-throughs; all traffic received is passed directly to the recipient’s own mailbox. There is no need for them ever to connect to the Roundcube system. Creation and management of these mailboxes is made via the PlanetHoster website (see below for details).
MGF role mailboxes
To minimise the effort needed when changes are made to MGF’s management team, each MGF role has a domain mailbox whose name reflects the role (e.g. secretary@mediterraneangardening.fr). All email links on the public site and all transactional emails in the Member App use these email addresses rather than the incumbent’s personal one. As mentioned above, all traffic received in these mailboxes will be forwarded automatically to a personal email address chosen by the incumbent. Although most members of the management team have this official email forwarded to the address in their member record, this is not obligatory.
Since email via an domain mailbox is received in the recipient’s own mailbox, any reply will come from that mailbox’s email address rather than the MGF role address. In fact, any attempt to do otherwise would probably be blocked for security reasons by the mail server of the member’s own email address.
When a new person is appointed to an MGF management role, the only action required is to change the forwarding address in the domain mailbox.
Maintenance of domain mailboxes
To make changes to the domain mailboxes, login to PlanetHoster and go to Email Accounts as follows:
Login -> Web Hosting -> Account Management -> login to mediterraneangardening.fr (click the right arrow) -> Messaging -> Email Accounts
(If the text appears in French, click ‘EN’ which will be at top right or bottom left of the pages).
A list of the mailboxes will be displayed, each with a number of action icons (hover over them to see what they do).
To change a forwarding address, login* to the mailbox and click ‘Settings”-> ‘Filters’. Next click the filter name (normally, there should only be one) in the Actions column to open the filter details. Update the email address as required but do not alter anything else. Click ‘Save’.
* Logging in will require the password. If this is unknown, change it. As the only people who access these mailboxes are site administrators, this will have no impact on use of the mailbox by others.
To add a new mailbox, type the role name in the box, press ‘Create’ and follow the instructions. Once the mailbox has been created, login to it and create the necessary filter: Settings -> Filters -> Create. Enter the filter details as follows:
Filter name: name of the new role;
Filter enabled: ON;
Scope (dropdown box): all messages;
Actions: Send message copy to [incumbent email address] (click ‘+’ to add another recipient);
Click ‘Save’.
When creating a new role who will be able to send messages to members, it is necessary to add the new role to the list of approved senders in Brevo. See the Brevo page for how to do this.
The email address table
Placing email addresses on a web page is a security risk as they can be harvested by malware. To prevent this happening on the site, the real email address is replaced by a slug and a call to a special routine. This routine uses the slug to find the real email address in the email address table and then starts the mailto function of the browser. This table must be updated whenever there is a new contact person, a new partner organisation or a new MGF role.
To add an email address link on a page, create a link with the editor. This link should be as follows: ‘https://mediterraneangardening.fr/webmailto?addressee=[slug]’ where [slug] is a one-word, unique identifier for the addressee, e.g. JSmith or MGMR. Apart from the slug, the table contains three elements:
Type: Can be ‘Individual’ (email to be sent to a named individual); ‘Partner’ (email to a partner institutional mailbox, e.g hortusacl@orange.fr); or ‘MGF Role’ (email to an MGF institutional mailbox, e.g. treasurer@mediterraneangardeningfrance.org). See also section below on Former Members.
Name: The name of the addressee. This name is what is displayed when using the Forthcoming Events table.
Email address: The addressee’s email address.
Former members
EU privacy legislation requires that, when someone ceases to a member of MGF, they may not be contacted on MGF business and their personal information (including their email address) be removed. The Member App routine which performs this function updates the email address table. Type is changed to ‘Former’ and the email address to ‘secretary@mediterraneangardeningfrance.org’. This is to ensure that, in the event of a viewer clicking a link on a public page that still points to the individual concerned, the resulting email is redirected away from them to an MGF official.
Member to member emails
Some features of the Member App (e.g. the Member Directory) allow the user to send an email to another member by clicking on the name of the desired correspondent. Such emails are normally sent using the mailto function of the user’s browser. However, some people do not have this function activated. To avoid problems, all Member App pages with an email feature call the page ‘Send an Email’, passing the correspondent’s id as a parameter. This has a button initiating the mailto function but also displays the correspondent’s email address to be used if necessary.
Security of email addresses
Email addresses are stored in the WordPress database which is protected by a firewall. Access to this database is via the Member App dashboard and (for administrators only) the system dashboard. Ordinary members who are part of the Member Directory can see the email addresses of other members of the Directory; otherwise they can only see their own. They can also amend their own address. All members of the MGF management team can see the email addresses of all members but only those in the Member Management team can amend them.
Provided that the slug mechanism described above is used, there are no email addresses on the public site. Within the Member App, all pages containing email addresses are generated dynamically; there are no static pages with email addresses.
Member email addresses are also stored in the Brevo database which has its own security arrangements.
All web sites need a hosting platform of the visible content and the code that supports it.
The MGF site is hosted in France by the service provider PlanetHoster. The access codes to this site are in the MGF Dropbox: Site coordinates.txt.
Within PlanetHoster, the code and content of the site are held in two separate areas: the public_html folder as used by all websites and an SQL database. The first can be accessed via FTP. In normal circumstances, access to the second is not required but if it is, it can be reached by use of the WP-phpMyAdmin plugin from the adminstration dashboard (see next section): open the plugin and click ‘Enter local php MyAdmin’. For more details about hosting, see the Internet Service Provider page.
NOTE: The PlanetHoster platform contains the entire site; nothing is held anywhere else. However, the site is also backed up daily (automatically) to a remote site located somewhere in the European Union via the BlogVault plug-in.
Dashboard
The dashboard is the control panel for the entire WordPress website. It is used to create and manage content, add functionality, change styling and so on. To access it, a user must login. What any user sees in the dashboard depends upon their access privileges. Administrators see everything but all other users see only the MGF Member App.
The dashboard has three elements: at the top, a taskbar; on the left-hand side, a sidebar with a menu of different functions; on the right-hand side, the dashboard for the MGF Member App. The layout of each of these elements can be modified but it will not normally be necessary to do so. Some functions available in the dashboard will relate to content creation, others to administrative functions or the MGF member app. For a complete list of all these functions, see here.
Backup & Recovery
Backup and recovery of the site is performed by the BlogVault plugin. The backup data is stored in a different location from the site hosted by PlanetHoster. Although the location of the backup site is unknown to us, it is within the EU and so meets GDPR requirements.
Plug-in / WordPress Core updates
Regularly, there will be upgrades to both the WordPress core and to plugins. Unless there is a good reason not to, these upgrades should be made as soon as possible in order to maintain the integrity and security of the site. If in doubt concerning an upgrade (for example, a major new release of WordPress), then it is advisable to carry out a special backup of the site before executing the upgrade.
Pending upgrades are notified in a number of ways:
In the taskbar at the top of the dashboard, next to ‘Mediterranean Gardening France’, is an icon consisting of two circular arrows and a number which indicates how many upgrades are pending. Clicking this icon will open the updates panel in the dashboard.
Hovering or clicking ‘Dashboard’ in the dashboard sidebar will show a sub-item ‘Upgrades’ together with the number of pending upgrades. Clicking this sub-item will open the updates panel in the dashboard.
In the dashboard sidebar menu, the number of any pending plugin upgrades will be shown next to the ‘Plugins’ menu item.
Whenever a new upgrade is available, Wordfence, the security plugin, will send an email to intmedgard@gmail.com.
As an organisation which communicates with its members solely by electronic means, email addresses are very important to MGF. For details on how MGF manages these, see Email Addresses.
To send messages to the membership, MGF uses the Brevo messaging service.
Costs
Costs for the site consist of the hosting of the site (including registration of the domain name) and the annual fee for a number of premium version plugins. In theory, the site also has to pay to use Google Maps (the Gardens to Visit page). However, the number of free hits that are allowed is greatly above anything that the site is likely to need. Nevertheless, a monthly invoice is sent with an amount due of zero. A perpetual licence was purchased in 2020 for another premium plugin, wpDataTables, so there are no ongoing costs for this. MGF has an account with each of the suppliers of the paying elements. All have been set up to use the MGF credit card. As with all such arrangements, the card details have to be updated from time to time. Payment details and invoices can be accessed by logging in to the appropriate account. Login credentials for all these accounts can be found in the MGF Dropbox. The following table details all cost elements (prices as per date at foot of page.
Most pages on the site are created using the Gutenberg editor in the normal way. Pages which consist mainly of lists, however, are created using a special procedure which is described below. These pages are proper WordPress pages and are stored in the WordPress database but they should never be edited in Gutenberg, only by the special procedure. The reason for having this special procedure is that list pages are likely to be changed frequently and some of them are very long; trying to edit them with Gutenberg would be very cumbersome and unwieldy. The names of all the list pages can be found on the List Generation page (see below).
Update Procedure
Updating a list page is a two-step process. First update the table which holds the data for the page by going to the dashboard sidebar and then clicking ‘Pages’ -> ‘List Generation’. This will open the List Generation page. Now click ‘Update a list’ to open the ‘List Maintenance’ page. Select the list to be updated by clicking on the appropriate down arrow. At the top of the List Maintenance page is a link to the instructions on how to update each list.
Once you have updated the table, generate the new version of the page by going to the List Generation page and clicking on the name of the page which you wish to regenerate. The page will be regenerated and you will see a pop-up box with the message ‘[page name] created successfully’. Generating a page will overwrite an earlier version of the page if one exists. Occasionally, this process does not work correctly and a second page will be created, leaving the old one intact. This will be noticeable if the page, when displayed, still shows the old content even after refreshing it. If this happens, delete both versions of the page and regenerate as described.
Internal Structure
Most of the tables used to create list pages are managed by the wpDataTables plugin; the others use Excel spreadsheets which can be found in the public_html/wp-content/other_files folder. Details on how to use the plugin can be found here. The following table shows which internal database table corresponds to each list page. Tables whose name begins with ‘wp_mgf_datatable_’ were created using the plugin; the other tables were imported into the new site from spreadsheets which were used on the old one.
For ease of maintenance, new list pages should use Excel spreadsheets rather than a wpDataTables table.
Headers
wp_mgf_wpdatatable_5
Lists
wp_mgf_wpdatatable_6
Tab Names
wp_mgf_wpdatatable_7
Plant lists (exc. Plants for Wildlife)
wp_mgf_plants
Plants for Wildlife
wp_mgf_wildlife_plants
Recommendation Types
wp_mgf_wpdatatable_8
Recommendations (exc. Books)
wp_mgf_recommendations
Recommended Books
wp_mgf_books
Forthcoming Events
wp_mgf_wpdatatable_10
Email addresses
wp_mgf_email_addresses
Gardens to Visit
wp_mgf_visits
Comestible Plants (Excel)
MasterComestiblesList.xls
Seed list (Excel)
MasterSeedList.xls
List Generation Processes
Adding ‘List Generation’ as a customised option in the Pages tab of the dashboard
This is performed by the function ‘list_maint_menu’ which be found in Section 2 of functions.php. An additional purpose of this function is to define the function to be called when ‘List Generation’ is clicked in the dashboard.
Populating the List Generation Page
When ‘List Generation’ is clicked, the function ‘list_maintenance_contents’ is launched (functions.php Section 6); this populates the List Generation page at right in the dashboard. Included in this function is a Javascript routine which is activated when the name of a list page is selected for (re-)generation.
The Page Generation Process
Each list page is generated by an MGF-developed plugin. These can be found in the wp-content/plugins folder and have names which begin ‘create-‘. When the name of a list page is clicked, the Javascript routine mentioned in the previous section uses AJAX (Asynchronous JavaScript And XML) to call the appropriate plugin, passing to it the required parameters and receiving return information upon completion of the page generation. Three parameters are passed: the name of the list, the title of the page to be generated and the name of the plugin. The return information indicates whether or not the page was created successfully.
Structure of an MGF-developed Plugin
All MGF-developed plugins use the same basic structure. Here is the example of the Recommended Books list:
add_action(“wp_ajax_create-books-list”, “add_books_list”); add_action(“wp_ajax_nopriv_generate-list”, “please2_login”); function add_books_list()
The first add_action postpends the name of the plugin (‘create-books-list’) to the standard prefix ‘wp_ajax_’ and links it to a function in the plugin which does the actual processing (‘add_books_list’). The second add_add action is triggered if the user is not logged in and calls the ‘please2_login’ function (functions.php Section 6) which halts the process.
The functions called by the first add_action also have similar structures:
Using the information passed by the parameters, check if there is an existing page with the same title. If so, retain the page ID for future use. If there is more than one page with the same title, end the process with an error message.
Assemble the page content (see below).
Create the page (or replace the existing one using the retained page ID).
Create the return information and pass it back to the calling Javascript routine where it will be displayed.
The page content is assembled into a single variable by a function with the following structure:
Using the list name passed as a parameter, get the page header information from the ‘Headers’ wpDataTable table.
Format the header and place it in the content variable.
Retrieve all items for the list* from the appropriate wpDataTable table or Excel spreadsheet.
Format a display line for each item and postpend it to the content variable.
Return the content and any supplementary information to the calling routine.
* If the page uses tabs, then the function will cycle through the list of tabs, selecting the appropriate items.